Connecting to Jupyter Notebook Running on PSY Cluster using Your Laptop/Desktop Browser 🔒
Note:Cluster head node may change in the future, this example is using “neurocomp0.utsc.utoronto.ca”.
Note:Click on the images to see details.
1: Open a terminal and connect to neurocomp0 using SSH without X forwarding (don’t use -X or -Y argument), and then run the following command, for example (jupyter is the session name):
tmux new -s jupyter

2: Start a Slurm job using srun. The resources you allocate using “srun” are what you are going to use on the cluster through your Jupyter Notebook server (the following example asks for 2 CPU cores from the “cpu” partition, however, you can also use “gpu” or “gpudebug” partion):
srun -p cpu -c 2 --pty bash -iYou’ll see that you are connected to a compute node after running the srun command (“neurocomp6” in this example). Here is a short explanation of the srun arguments:
"-p cpu": connect to the "cpu" partition ("cpu" is the default session when "-p" isn't specified)
"-N 1": connect to one node
"-c 2": allocate 2 CPU cores
"--pty": this is an interactive Slurm session
"bash -i": command to run

3: Load Python/Anaconda3 environment:
module load python
 You can see in this example, the default jupyter command after loading the module is from “/pkgs/anaconda3/bin/jupyter”.
4: To avoid port conflicts, let’s use your UID+5000 as the port that Jupyter listens on for your browser to connect to. You can find your UID using the id command:
 id
 In this example, the UID is 2001, plus 5000, so the port is 7001.
5: By default, Jupyter Notebook listens on the local IP – 127.0.0.1, but we need to let it listen on the external IP, to find out the external IP, run:
ifconfig | more
 In this example, the IP is 142.1.104.8.
6: Now we can start Jupyter Notebook (you have to replace PORT and IP using what you have got, so don’t just copy & paste):
jupyter notebook --no-browser --port=PORT --ip=IP
 You’ll then have Jupyter Notebook running on the cluster ready for connections. You’ll need the token to sign in.
Note: We don’t have access to the compute nodes directly from your laptop/desktop, everything needs to go through the head node(s). Trying to connect to the given Jupyter Notebook URL from your laptop/desktop will time out.
7: Now we need to create an SSH tunnel from your laptop/desktop to the Jupyter Notebook through the head node neurocomp0. The example given here is using PuTTY on a Windows system.
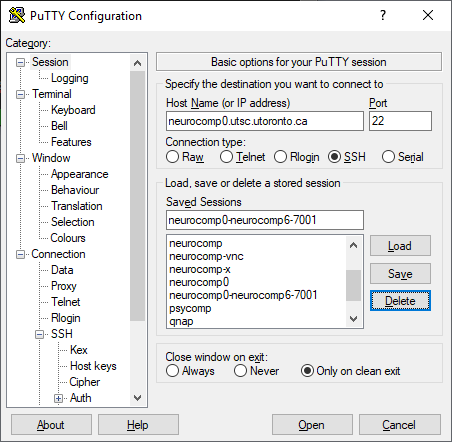
Creating a PuTTY session
Note: For Linux and MacOS users, the following command should work, for example (LPORT and RPORT in this example should both be 7001):ssh -L LPORT:neurocomp6:RPORT USERNAME@neurocomp0.utsc.utoronto.caFor Mac users, if the above tunnel produces errors like “Open failed: connect failed: Name or service not known”, please try the following command:
ssh -L :LPORT:neurocomp6:RPORT USERNAME@neurocomp0.utsc.utoronto.ca
8: PuTTY – adding port forwarding:
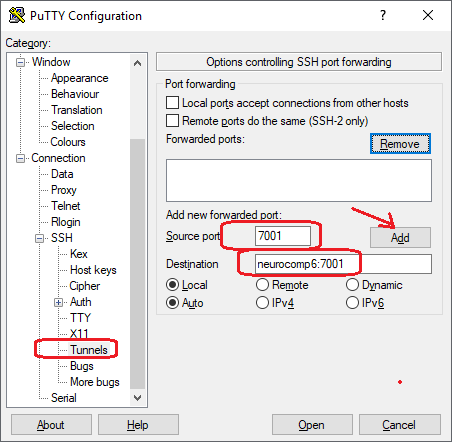
Adding tunnel to a PuTTY session
9: PuTTY – adding port forwarding (2):
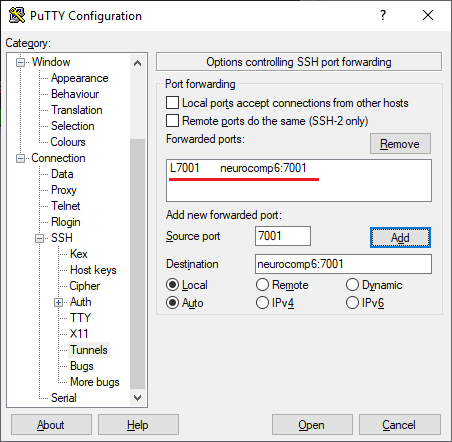
Adding tunnel to a PuTTY session
10: PuTTY – saving session configuration for future use:
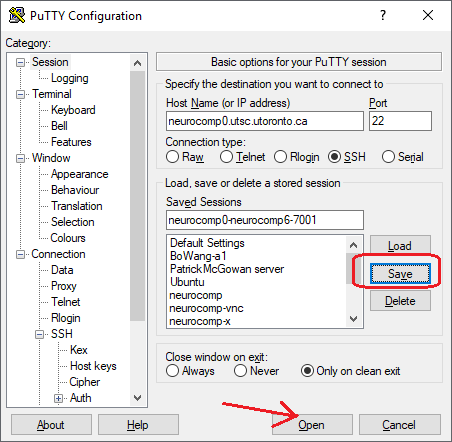
Saving PuTTY session configuration
11: Open a browser on your laptop/desktop and connect to the Jupyter Notebook running on the cluster:
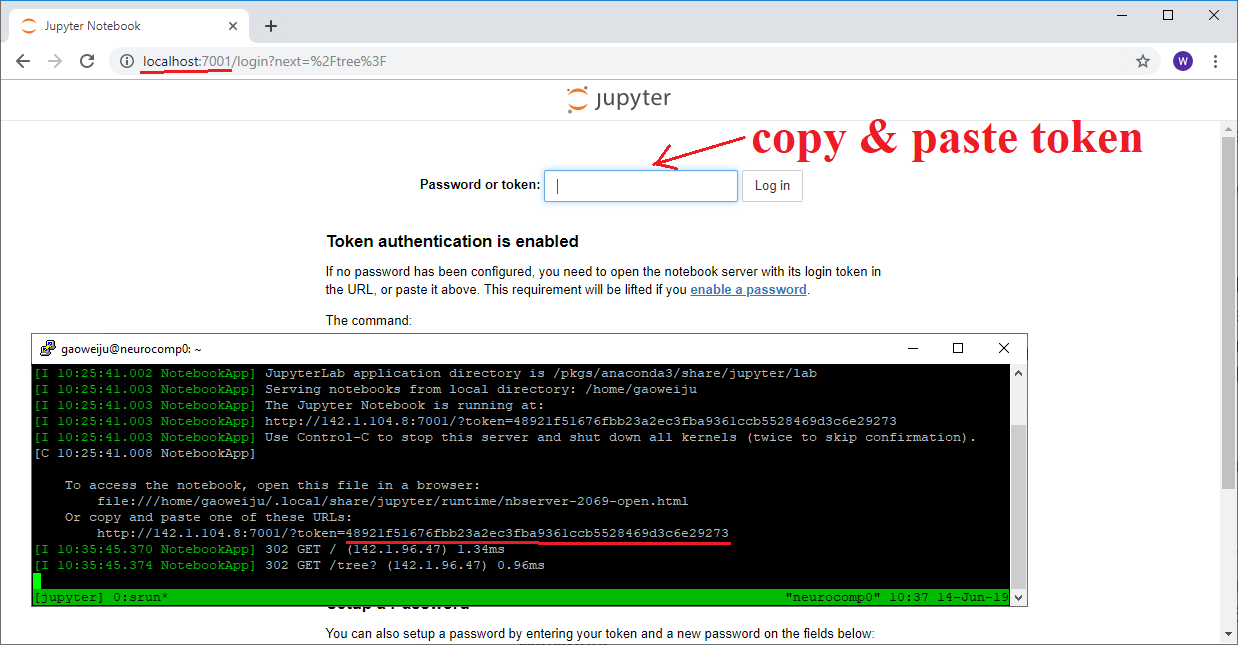
You’ll need the Jupyter Notebook token to log in.
Recent Comments